Showing posts with label tutorial. Show all posts

DIY: Pom Pom Garland

Here are a few easy steps to make your very own pom pom garland!

Materials:
Fork
yarn
scissors 
needle


Directions:

Step One:  Wrap yarn around fork and cut yarn.  The amount of times you do this will depend on (1) the thickness of your yarn and (2) how big you want your pom pom to be.  With this particular yarn, I wrapped it around the fork 35-40 times.  With a different yarn (which is pictured below), I wrapped it around the fork about 60-65 times for the same size.  

 Step Two:  cut a piece of string about 8in in length and fold in half.

 Step Three:  Pull folded string through the two middle prongs. 

Step Four: Wrap string around so both ends are on one side of the fork.  Tie the string once to hold yarn together, then remove fork and tie once more to make a secure knot. 

Step Five: Tie the string once to hold yarn together, then remove fork and tie once more to make a secure knot. 

Step Six:  Using scissors, cut looped yarn on one side of the knot so it becomes frayed.

 Step Seven:  Cut looped yarn on the other side of the knot. 

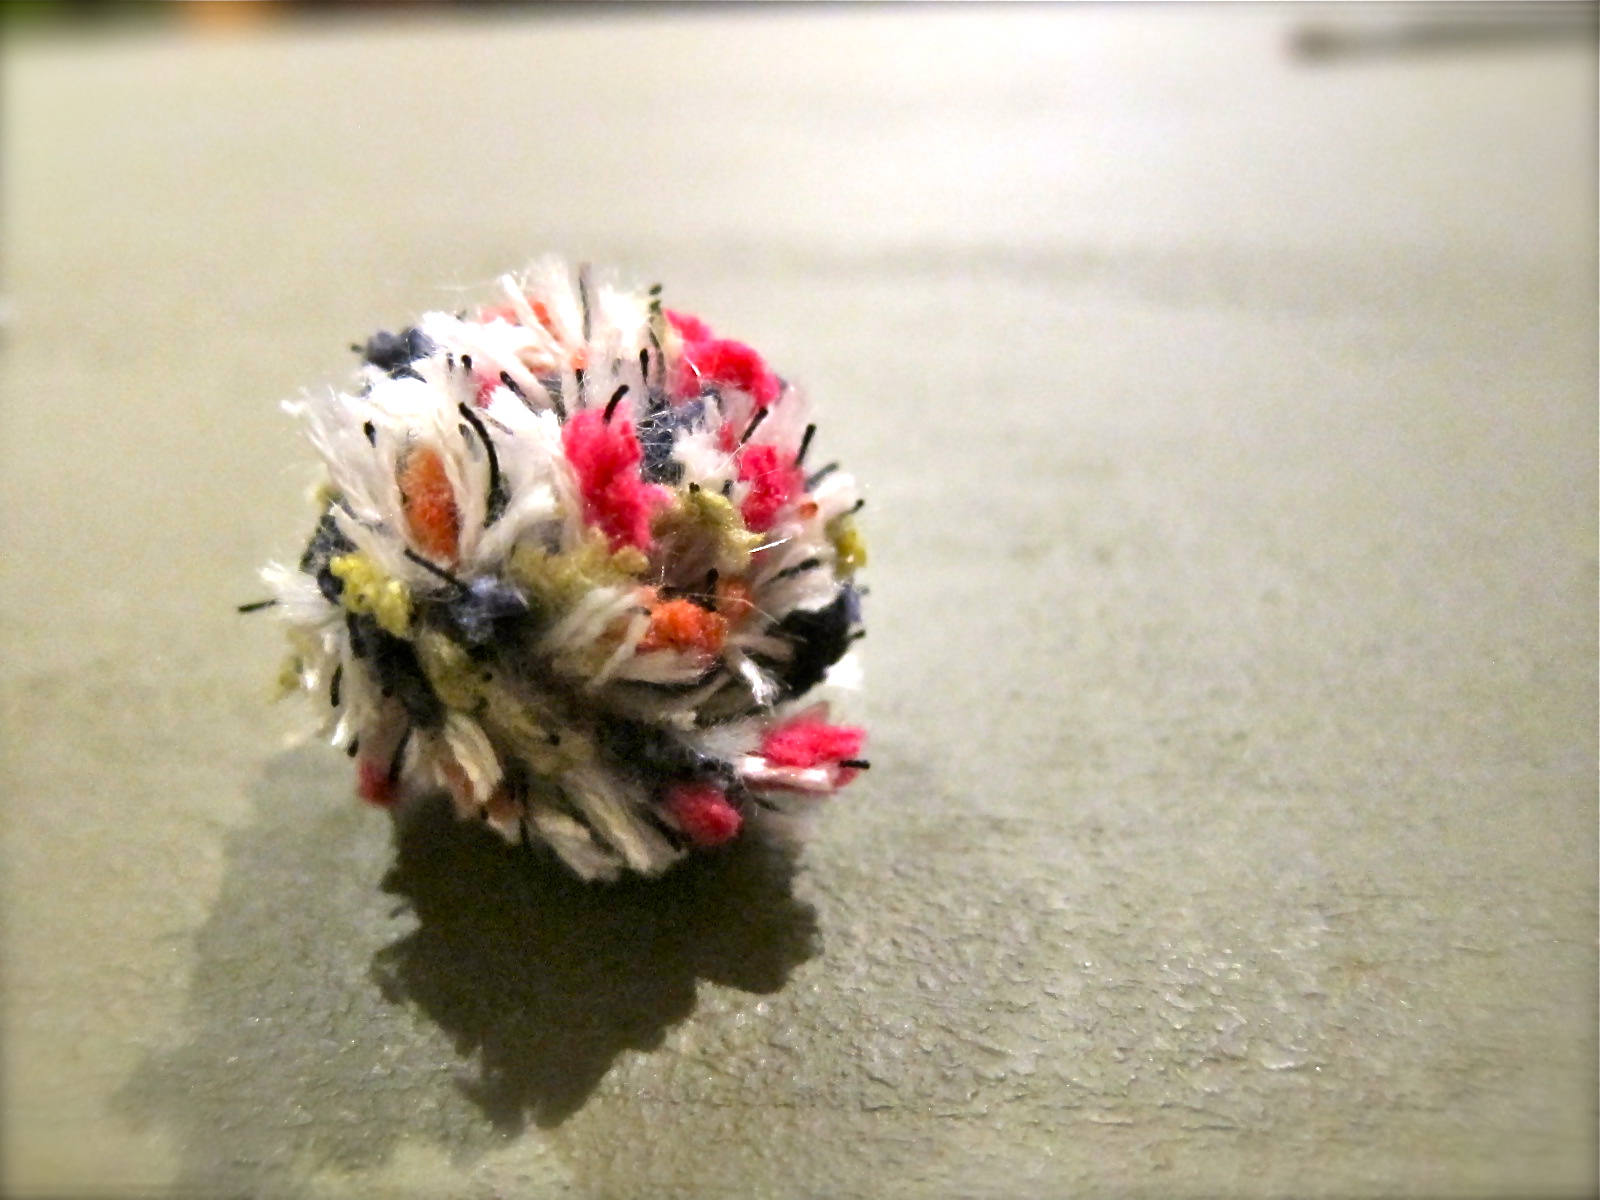
Step Eight: Trim your pom pom into a nice ball

 Step Nine: Repeat steps 1- 8 until you have reached the desired amount of pom poms.  (I made 48 of each kind) 

Step Ten: Using needle and yarn, string poms in alternating colors.  You can have them right next to one another, like so...

Or you can leave an inch or two between each one. 

Step Eleven: Put it on the tree :]

Even though this is time consuming, it doesn't take much thought once you get the hang of it.  I often made the poms while watching TV or a movie with the hubby.  

<3 Saleena 
Continue Reading...

DIY: Ruffled Christmas Tree Skirt

Finals are DONE! Whoohoo!  It's time for celebrating.  How to best celebrate freedom from studies? Crafting of course!  Christmas is right around the corner, and because it is our first Christmas together (meaning we have absolutely no decorations), I have a lot to get done! When I stumbled across this tree skirt on HGTV's website, I fell in love.  The best part?   IT'S NO SEW!  So anyone can do it.  :]


Materials:
4-1/2' x 4-1/2' piece of canvas
measuring tape
5 yards cream linen (Or whatever color you would like - even christmas patterned!)
sharp scissors
fray-blocking glue
3 1/3 yards ribbon
hot glue gun and hot glue sticks

Directions:
Using a tape measure, mark and cut a square of canvas that is approximately 4-1/2' x 4-1/2', then fold into quarters.


 Once into quarters, fold canvas over itself to form a triangle with the folded center at point. Cut base in a quarter circle.


 Cut a small quarter circle out of the point.

 Open the skirt until it's folded in half and cut along the radius on one side of the center hole only. This will provide slit in the fabric so the skirt can be placed under the tree. 


Apply no-fray glue along all raw edges and allow to dry. Tip: A canvas painter's drop cloth is an inexpensive material perfect for this project.

Using sharp scissors, cut linen fabric lengthwise into 2.5-3 inch-wide strips. A little tip?  If your flooring allows, use your grout line as a guide.  These strips don't have to be perfect.

Preheat hot glue gun. Apply a line of hot glue approximately 1 1/2 inches from outside edge of skirt. Create ruffles by pinching linen with fingers and pushing gathers down onto hot glue. 


 Continue this process around the entire skirt edge. 

 Start the next row approximately 1 1/2 inches above the previous row. 

Repeat this process until its all done!  Just be forewarned, this is a pretty time consuming project. But don't be discouraged, the result is well worth it!

Next, cut 10 pieces of ribbon into approximately 12-14 inch lengths. Use hot glue to attach ribbon to underside of tree skirt along slit created in canvas base. (For added strength, I stapled the ribbon first and then hot glued it to the canvas.  Be careful not to staple your ruffles! Because the bottoms of the ruffles are not glued down, you are able to staple underneath them). 

Evenly space five on one side of slit and five directly opposite.

Place skirt under tree and tie ribbons together in bows.

Isn't it gorgeous?  
I think so. :]

Posted on 

&
Craft & Tell
&
&
A Crafty Soiree
FeaturedAtSBLC Thrifty Thursday Week 53
&
freckled laundry
 
&


Happy ruffling! 

Saleena <3

Continue Reading...

Tutorial : Fabric Flowers

I first stumbled across this brilliant tutorial when I was wedding planning.  I thought it would be great to make fabric flower center pieces (which go wonderfully with the vintage theme) and have them double as favors.  This could have been a possibility if 1. I had much longer to plan than four months and 2. lots of people willing to help out.  So if you want these to be part of your big day, or just want to add a little something t your home decor, these little treasures are sure to make you swoon. 


Materials
Cute Fabric (mismatch or coordinating) 
Thread
Sewing Machine
Glue gun
Iron
Fabric Scissors
Sticks (I collected them on the last hike Matt and I went on...don't tell the forest ranger!)
Glass Jar/Vase
Yarn (optional)


1. Cut fabric in 5" x 45" strips.  


2. Fold strips in half lengthwise and iron flat. (Your strip is now 2.5" x 45")

3. Open up strip.  Sew a gathering stitch along the pressed seam. Fold back into  place.

4.  To cut the petals,  scallop the open ends of the strip.  Each scallop is approximately 2-2.5 inches.  If you make a small mark at the open end every 2-2.5 inches it will help guide you as you cut.

5. At one end make a tail.  It's about one inch wide by at least 4 inches long.

6.  To make things easier, use the first one and place it on top of another strip and use it as a pattern to cut the scalloped edge.  These don't need to be perfect.

7.  Sew the scalloped edges together.  Contrasting thread adds a little pop of color, but you can do what ever you please.


To get the rest of this tutorial, visit Snowy Bliss

For the vase, I used a glass jar and wrapped white and yellow yarn around it. 


I absolutely love how they turned out!  Now I will always have beautiful flowers at home :]
  

<3 Saleena
 
Continue Reading...

Tutorial: How to Paint a Still Life

Since I have started school, blogging has been placed last on my priorities list.  I've missed the cooking and DIYing, and of course, I've missed hearing from my readers. Then I came up with a great idea...why not bring my school work to my blog? Sounds fabulous!  Remember the painting class I was so excited for that I made a bag to hold all of my paint brushes?  Well, it's going wonderfully and I am having a great time learning how to paint.  I'll show you basic steps to start you on your still life, and let me know how it goes!  It is very relaxing, and the perfect escape from a busy schedule.  It does take a while to complete, but you don't have to complete it in a single day.  I would encourage you to give it a shot :]

Materials:
Oil Paint
Canvas
Brushes
Palette for your paint
Solvent Mixture (1/2 part stand oil and 1/2 part mineral spirits)
Piece of paper
Pencil & Eraser
Paper towels (to clean brushes)
Easel or surface to paint on
Light source (I used a desk lamp)
Apron (optional, but recommended) 

Step One: Set up your display
Keep in mind that you want a pleasing composition.  A light source adds shadows, which will give your painting dimension.

Step Two:  Thumbnail sketch
 This will allow you to decide where exactly you are going to place your objects on your canvas.  (Landscape vs portrait layout, fitting everything the frame vs cropping)

Step Three:  Sketch it on your canvas
Make sure to include the shadows! (I know my vase is shorter than it is supposed to be, but I didn't want to crop it out of the frame.)

Step Four: Refine
Use Burnt Umber to outline your sketch, but be sure to refer back to the display.  (Your sketch drawing may not be completely accurate.)

Step Five: Fill in shadows
Use Burnt Umber again to fill in the shadows, applying the solvent mixture to thin out your paint.


Step Six: Paint your darkest darks and lightest lights

Step Seven: Cover your canvas


Step Eight: Blending and Details
The thing I love about oil paint is that it takes a while to dry, unlike acrylic.  So blending is much easier to do. 

I hope you enjoyed this tutorial! You don't have to have a fancy set up to do this (I covered my ironing board and used it for my materials). Just have fun :]


<3 Saleena
Continue Reading...
Related Posts Plugin for WordPress, Blogger...

Followers

Follow Me!

As you may know, Google connect will not be on blogger for much longer, so PLEASE follow me through Linky Followers!