Strawberry & Banana Nutella Crepes

Have you ever had one of those mornings where you feel like eating dessert for breakfast? Please tell me I'm not alone in this! I found this recipe, and decided it was worth repeating...again and again. The only downside to making crepes is the time it takes.  If you don't want to sit in front of the stove for an hour cooking one at a time, I would have two pans going, like I did after cooking the first few.  The upside to making crepes is you don't have to own a crepe maker!  Granted, they may not be as pretty, but your taste buds will agree they are just as delightful. This recipe serves four. 


Ingredients:
1-1/3 cup soymilk
1 cup whole wheat flour
2 egg whites
1/2 cup water
2 Tbsp unsalted butter
2 whole bananas, peeled and sliced
10 strawberries, sliced
4 Tbsp Nutella
 

Directions:
Preheat oven to 200 degrees.

Place soy milk, flour, egg whites and water into a bowl and whisk rapidly until well-combined. I used my kitchen-aid stand mixer for this. 


Heat a medium-sized, shallow skillet on medium heat. Melt 1/2 tsp of butter in the pan and pour 2 Tbsp of batter in the center of the skillet and lean/swirl the pan to spread out the batter as thin as possible
 
When the edges begin to look dry, lift with a fork to check the color. Once the crepe is golden brown on the bottom, using the fork on the edge and flip until both sides are golden brown.  When cooked, place on a cookie sheet in the oven. Continue this process with the butter, pan and then cookie sheet until all the batter is used.

Here comes the fun part! Spread a thin layer of Nutella on the top of the crepe
Then add several slices of banana and strawberry
Roll it up, and add more fruit
And indulge! :]


First time making crepes = success

They are easy to make and ubber delicioso!
Plus, they are sure to impress any guests you are having over ;]

<3 Saleena
Continue Reading...

Honey Roasted Peanut & Pretzel Crusted Chicken

If you are looking to cook something easy and fun, or maybe making dinner for kids, this is sure to be a hit.  This chicken is so crunchy and has a great flavor.  Plus, I am going to add one of my favorite recipes for honey mustard dipping sauce...it's real good.

Ingredients:

For chicken:  
1/2 bag salted pretzels, any shape  
1/2 cup honey-roasted peanuts, coarsely chopped  
3 sprigs fresh thyme or 1 tsp dried thyme 
Salt and pepper  
2 eggs  
 2 pounds boneless, skinless chicken breasts, cut into 1/2-inch-thick strips  
1/4 cup extra virgin olive oil (EVOO)  
Honey mustard or barbecue sauce, for drizzling 

For Honey Mustard Sauce: 
1/4 C Honey
1/4 C Dijon mustard
1/2 Tbsp Hot sauce
2 Tbsp Chives

For the Veggies:
1 Zucchini, sliced
1 Squash, sliced
Salt & pepper
2 Tsp Olive oil
Italian seasoning


Directions:  
To make the sauce, add honey, mustard, hot sauce, and chives in a bowl and stir to combine.  Place in refrigerator until ready to serve. 


Place the pretzels and peanuts in a food processor or blender and grind until fine. Transfer to a shallow dish, add the thyme, season with salt and pepper and mix to combine.


Pre-heat a large skillet with EVOO, enough to go a quarter-inch up the sides of the skillet, over medium-high heat. While your oil is heating up for your chicken, add oil to a small skillet and once it is hot add your veggies.  Season with salt, pepper, and Italian seasoning.  Cook until tender. 

 Crack and beat the eggs in a second shallow dish with a splash of water.

Coat the chicken in the ground pretzels and peanuts, then the eggs, then the pretzels again. (Double dippin' :])


Add the coated chicken pieces to the hot EVOO. Cook in a single layer, in two batches if necessary, about 3-4 minutes on each side, until the cutlets' juices run clear and the breading is evenly browned. 


Serve with a drizzle of honey mustard or barbecue sauce and veggies.
 Yes, there is a bite taken out of one of my crunchy chicken fingers....I couldn't wait! :]

<3 Saleena

    Continue Reading...

    Tutorial: How to make a brush bag

    I am taking a painting class this fall, and I am SO excited.  I have always enjoyed painting and have completed a few things here and there (one being my guestbook, seen below) but I have never taken an art class. 

    In the midst of my anticipation, I have been collecting all of the required materials for the class, although did not come across a brush bag that would fit my brushes.  [They are quite tall.] So, I decided to get creative and make my own - something unique yet convenient. 

    Materials:
    Canvas
    Material with decorative print
    Straight pins
    Thread
    Ruler
    Scissors/Rotary Cutter 
    Straps/Ribbon


    Step 1: Measure Your Canvas
    I started with cutting a corner off of the canvas curtain we used as our photo booth backdrop.  Because it was a corner, two sides were already sewn for me. 


    Step 2: Straight pin your sides


    Step 3: Sew your sides


    Step 4: Measure more canvas material for a pocket, straight pin, and sew.


    Step 5: Straight pin and sew pocket on canvas back


    Step 6: Measure brushes
    I found the easiest way to do this is place your brushes in your pocket and with a ruler draw a vertical line to follow while sewing. Make sure there is a enough room for your brushes to fit while it still being tight enough to hold them in place. 


    Step 7: Sew along lines


    Step 8: Measure another fabric to be a little bigger than the canvas back


    Step 9: Straight pin the sides and sew


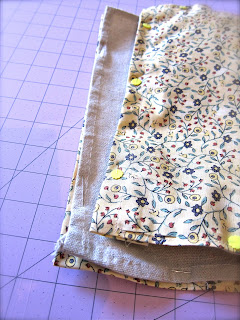
    Step 10: Straight pin fabric to canvas and sew


    Step 11: Straight pin straps and sew
      A couple years ago, Matthew bought me a dress from Anthropologie for Christmas, and the box was tied with this adorable button ribbon.  I've held on to it, knowing I was going to use it somewhere.


    Step 12: Sew on your straps
    Make sure to only sew a few inches of your straps so you have enough material to wrap around your bag 


    And thats it!  Here's the inside...


    And the outside :]

    This bag will work for make-up brushes and other accessories as well.

    Enjoy!

    <3 Saleena


    Continue Reading...

    Turkey Ranch Bacon Burgers

    When given the option of what to eat for dinner, I'll usually decide on a pasta dish with a variety of vegetables or even a homemade pizza with yummy toppings, but every once in a while, I like a good, juicy burger.  This recipe, by my favorite chef Rachael Ray, is not only delightfully satisfying for your taste buds, but it is one of the best recipes I've yet to make.  You must give it a try.

    Ingredients:
    For the burgers:
    • 2 tablespoons vegetable or olive oil
    • 2 pounds ground turkey, 93% or 85% lean
    • 4 cloves garlic, pasted or minced
    • 3-4 tablespoons grated onion
    • 2 teaspoons cumin (2/3 palmful)
    • 2 teaspoons coriander (2/3 palmful)
    • Salt and pepper
    • 6 rolls or hamburger buns
    For the ranch dressing:
    • 1 1/2 cups regular or low fat sour cream
    • About 2 tablespoons lemon juice
    • About 3 teaspoons hot sauce
    • About 2 tablespoon each parsley and chives 
    • About 1 teaspoon of dried dill
    • Dash of Red Pepper Flakes
    • Salt and pepper

    • For the toppings:
    • 12 slices bacon
    • Shredded or chopped romaine or iceberg lettuce
    • tomatoes

    Directions:
    • Pre-heat oven to 375ºF. Place the bacon on a rack arranged over a baking sheet and bake until crisp; reserve.

      Combine oil, turkey, garlic, grated onion, cumin, coriander, salt and pepper in a bowl. Form six large patties.


      For the ranch dressing, combine the sour cream with lemon juice, hot sauce, herbs, salt and pepper. Taste to adjust the seasonings.


      Heat a griddle, grill pan or cast iron pan over medium-high heat (I think the burgers were so juicy because I cooked them on a pan instead of the grill.) Cook large patties for 5-6 minutes on each side, or slider patties for 3-4 minutes on each side.

      Serve the burgers on buns topped with bacon, lettuce, tomatoes, some dressing. (You'll probably want some on the side too!) 

    This burger had tons of flavor, and the combination of the bacon and homemade ranch dressing was SO yummy.  For sure making this one again :]

    <3 Saleena 


    Continue Reading...

    Calling All Shoppers!


    My rental site is finally up! And thanks to my beautiful friend Lauren, and sole follower I might add, I have a creative name to go along with it.  Are you ready for this??

    Click here: The Vintage Vault

    Now all I need is to get my name out there.  If you have friends or family getting married, or throwing an event that could use some vintage touches, point them my way! I am so excited to see where this goes :]

    <3 Saleena
    Continue Reading...

    Cinnamon and Nutmeg French Toast

    Make this for breakfast, and your tummy will surely be satisfied :]


    Ingredients:
    1 egg
    1/2 cup soy milk 
    dash of spice cinnamon

    dash of nutmeg
    4 slices of bread (100% Whole Grain bread for the healthy alternative)
    1/4 cup fresh berries
    Misto (olive oil cooking spray - a must have in every kitchen!) 


    Directions:
    Beat egg, milk, and spice together. 

    Heat griddle or non-stick pan over medium heat. Add cooking spray and dip bread in egg mixture. Place on griddle and cook for 3 minutes on one slide. 

    Flip and cook for one more minute until egg is cooked through. 

    Slice the berries and top them on the toast

     or find a cookie cutter and make a great tasting breakfast an adorable one, like snack-girl did


    <3 Saleena

    Continue Reading...

    Barbecue Turkey burgers & Baked Potatoes

    Matt and I went to a friend's beach house for the weekend, and my darling friend Katie brought delicious burgers to cook up.  She was unsure how they would turn out, but they were SO juicy and full of flavor.  She said she used barbecue sauce and onion soup mix.  So I went home and looked for recipes including these ingredients, but for turkey burgers.  (Matt and I use ground turkey instead of beef because its healthier, and because Costco and a four-pack for $15) :]  After searching, I found this recipe online, and tweaked it a bit. 


    Ingredients:

    • 1 pound Fresh Ground Turkey
    • 1 (1 ounce) package dry onion soup mix
    • 1/2 cup chopped onion
    • 1/4 cup  Barbecue Sauce
    • 1/2 cup dry bread crumbs
    • 1 tablespoon soy sauce
    • 1/2 tsp salt
    • 1/8 tsp black pepper
    • Olive oil for grill
    • 6 hamburger buns


    Directions:

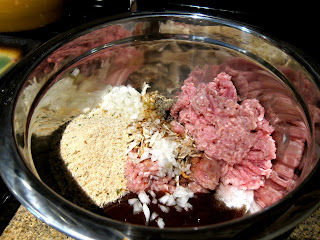
    Preheat grill for medium high heat. Combine ground turkey, onion, barbecue sauce, bread crumbs, onion soup, soy sauce,  salt and pepper. 

    Then form into 6 patties.


    Make sure to coat cold grill rack with olive oil because these burgers tend to stick. Cook patties 10-12 minutes, turning frequently for even cooking and browning. Make sure to throw the buns on the grill right before your patties are done.   

    To go along with my turkey burgers, I made my mom's baked red potatoes.  

    Ingredients: 
    1/2 packet of onion soup mix
    Italian seasoning
    Olive oil
    Garlic salt
    Pepper
    10-12 red potatoes (serves 3-4)

    I rinsed 10-12 red potatoes and cut them in 4-8 pieces depending on their size. Put them in a bowl and coat them with olive oil, added the onion soup mix, and coated with italian seasoning, garlic salt, and pepper. 


    Throw them on a baking sheet, and cook for 30-45 min at 425 degrees.  About 15 minutes in, make sure to turn the potatoes so they cook evenly. They should be golden brown and crispy when they're done!

    End result? 
     All-American goodness with healthier alternatives. (Turkey instead of beef, wheat buns instead of white, and baked red potatoes instead of french fries) Enjoy! :]

    <3 Saleena


    Continue Reading...

    Stuffed Shells with Pancetta and Spinach Goodness

    So I was sitting at home watching Everyday Italian, and Giada made this dish.  I couldn't help but give it a try.  If you are craving a rich Italian dish, you should too. :]  I tweaked it just a little bit, and I was happy with the results.


    Ingredients


    For the Shells:

    • 1 (12-ounce) package jumbo shells pasta
    • 2 tablespoons olive oil
    • 1/2 pound thick-cut pancetta, cut into 3/4-inch cubes
    • 16 oz frozen spinach, thawed and drained
    • 1 (15-ounce) container low fat ricotta
    • 1 cup Italian mix cheese
    • 1/2 teaspoon freshly ground black pepper
    • 1 can of basil and garlic chopped tomatoes

    For the Sauce:

    • 1 tablespoon butter
    • 1 garlic clove, minced
    • 1 cup whipping cream
    • 2 cups Italian mix cheese, plus 1/4 cup
    • 1/4 cup chopped fresh parsley
    • 1/4 teaspoon freshly ground black pepper


    Directions:

    Preheat the oven to 375 degrees F.
    For the shells:
    Bring a large pot of salted water to a boil over high heat. Add the pasta and cook until tender but still firm to the bite, stirring occasionally, about 8 minutes. Drain pasta.

    Warm the olive oil in a large skillet over medium heat. Add the pancetta and cook until lightly golden, about 5 minutes. 

    While that is cooking, empty can of tomatoes into a food processor and pulse until it become a slightly chunky sauce.  Then pour into a large baking dish and set aside. 


    Remove the pancetta from the pan when it's golden brown with a slotted spoon and transfer to a large bowl. 


    Add the spinach, ricotta cheese, Italian cheese, and pepper. Stir to combine. 


    Stuff the shells with about 2 tablespoons of the spinach mixture in each and place the stuffed shells in the baking dish on top of the tomato sauce.


    For the sauce:
    Melt the butter in a medium saucepan. Add the garlic and cook for 1 minute. Add the cream and bring to a simmer. Turn the heat to very low and add the 2 cups Italian cheese, parsley, and pepper. Stir until the cheese is dissolved. Pour the sauce over the shells. Top with the remaining 1/4 cup Italian cheese. Bake until golden on top, about 25 minutes. 


    The end result? Mouth-watering goodness. YUM!


    Turned out great.  The tomato sauce I added to the recipe balanced out the richness of the cheese.  If I make it again, I may add some sausage or shredded chicken. My hubby is a meat lover, for sure. 

    <3 Saleena 


    Continue Reading...
    Related Posts Plugin for WordPress, Blogger...

    Followers

    Follow Me!

    As you may know, Google connect will not be on blogger for much longer, so PLEASE follow me through Linky Followers!